How to Replace Angle Stops
How to Replace the Angle Stops and Supply Line
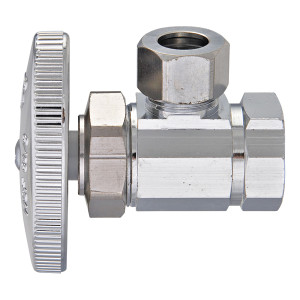
This do it yourself gradual instructions are simple steps to replace angle stops and supply lines in a bathroom. Angle stops are installed in almost all water fixtures to regulate the flow of water to the fixture and provide a place to shut off the water supply to one fixture while allowing the rest of the house to remain supplied. It is a plumbing code requirement to have the valves (angle stops) installed near the fixture so that one can regulate the fixture easily. Angle stops are valves underneath your bathroom toilets and kitchen sinks. These valves will turn off the water when you or your plumber works on your toilets and faucets.
Typically, to avoid corrosion, the use of copper tubing for water lines is basic, however, PEX is another common alternative to copper tubing.
Highlights:
Step 1: In removing the Angle Stop
Step 2: In replacing the Water Supply Line
Step 3: In reattaching the new Line and Valve
Step 4: In removing the Stem
Step 5: Clean the Stem before reattaching them
Step 1: In removing the Angle Stop
Shut off the water line first. Then disconnect the water line where it connects to the valve using a crescent wrench. In removing the angle stop, use two crescent wrenches, one to hold the compression nut and the other to hold the angle stop. In loosening it, turn the compression nut to loosen instead of the angle stop.
Step 2: In replacing the Water Supply Line
Remove and replace the crimped water supply line (nipple). Then use a stronger, reinforced supply line and add a new brass quarter turn angle valve.
Step 3: In reattaching the new Line and Valve
To reattach the new supply line and angle valve, first remove the compression nut and slide it over the copper nipple. Then replace the compression sleeve and tighten using two crescent wrenches — one wrench to hold the angle stop in place and the second to tighten the nut.
Step 4: In removing the Stem
The stem is the valve that’s controlled by the faucet handle. To clean it, first remove the stem, by using two crescent wrenches, one to turn the top and the other to hold the nut underneath the sink. After removing them, disconnect the parts of the stem and clean them thoroughly.
Step 5: In cleaning the stem before reattaching it
Scrub the stem clean with a brush and remove any caked-on debris before soaking it in white vinegar. Before reattaching the stem, lubricate the working parts of the stem assembly with faucet grease then reattach.
Rule of the thumb:
The angle (or straight) stops are purposely installed to control the flow of water to the fixture and provide you a place to shut off the water supply to a fixture while allowing the rest of the house to remain supplied. While you might consider on using the valves that are already installed which still works, it would save you time to replace it with a new valve which can last for another ten years. Generally, it is against code to install the angle stops or valves (stops) away from the fixture, it will only provide difficulty on regulating flow of water in the house when you need to shut it off, independently. Thus, it is required to provide angle stops on almost every water fixture in your home, office, schools or public places.
Recent Posts
Recent Comments
- Otilia on What is an Insurance Certificate of Liability?
- Funny Quotes app on How Install a Wireless Doorbell
- fifa 15 télécharger on What is an Insurance Certificate of Liability?
- http://devicat.byus.net/blog/36 on What is an Insurance Certificate of Liability?
- Find out more about China on Wikipedia on How to Install Radiant Heat Flooring
Archives
Categories
Meta
Info
Copyright © 2024 Landlord Network — from OnTheFirst!
Powered by WordPress and Apply Media